|
SeqMerge
Tutorial [Genhelp | Program Manual | User's Guide | Data Files | Databases | Release Notes ] |
Finding and masking vector sequences
Navigating through the alignment
Exporting contig consensus sequences
Introduction
This tutorial provides a brief introduction to and hands-on practice with the primary functions of SeqMerge. It is not intended to be comprehensive.
The lessons in this tutorial build upon one another; they are designed to be completed in the order they appear. This tutorial will take about one hour to complete. After completing this tutorial, you should be able to quickly create contigs from your own fragments.
What do I need?
To use this tutorial, you need:
1. An account to run the GCG at a licensed site
2. SeqMerge installed at the licensed site
3. A networked UNIX workstation running X Windows or a networked PC or Macintosh running X server software
These tutorial lessons assume that you are familiar with working with dialog boxes and with using a mouse to select, click, and drag. Some familiarity with your system’s UNIX operating system will also be useful. In addition, if you require an X server to display SeqMerge on your PC or Macintosh, we recommend that you take time to learn how to use it before using SeqMerge.
The exercises in this tutorial require example vector and fragment files. These files are available in the directory with the logical name SeqMergeDemoData.
This tutorial is designed as a quick overview of some of the primary functions of SeqMerge. You will perform the steps in the following sections to create a small sequencing project and assemble fragments into a contig.
1. Starting SeqMerge. Shows you how to start SeqMerge from a GCG environment via the command line or SeqLab, the X Windows based graphical user interface to the GCG.
2. Creating a sequencing project. Describes how to create and manage sequencing projects.
3. Adding fragments to a project. Shows how to enter new fragments into a project.
4. Finding and masking vector sequences. Takes you through the steps of adding and masking vector sequences within your project. If any of the fragments include vector contamination, you’ll want to mask the vector region so that it doesn’t affect the assembly.
5. Assembling fragments. Describes how to construct a single contig from masked fragments.
6. Viewing the contig. Demonstrates how to view a contig in the SeqMerge Contig Editor.
7. Navigating through the contig. Shows how to maneuver through the fragments in your contig.
8. Editing contigs. Shows how to edit the bases in a contig when you have fragment discrepancies.
9. Exporting contig consensus sequences. Shows how to make contig consensus sequences available to other GCG programs.
10. Exiting SeqMerge. Describes how to exit SeqMerge.
Before you begin
Before you begin the tutorial, there are a few steps you must take in preparation:
1. If you are using a PC or Macintosh, start your X server software and open a terminal emulation window, such as Xterm or DECterm.
2. Initialize the GCG environment by typing:
% source <Installed directory path> gcgstartup
% gcg
The system takes a few seconds to initialize the GCG environment and then display the GCG banner.
Initializing the GCG environment gives you access to the GCG programs, databases, and auxiliary files required for SeqMerge to run smoothly.
Note: The gcg command is how the package is initialized at most sites. If this command is not recognized at your site, see your system manager.
Starting SeqMerge
To start SeqMerge, Choose one of the following:
1. From SeqLab, select Fragment Assembly -> SeqMerge from the Functions menu.
2. From the UNIX command line, type the following:
% seqmerge &
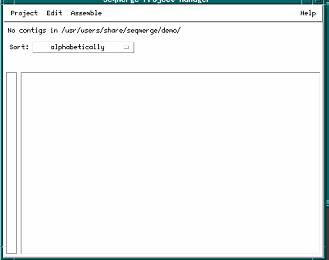
The SeqMerge Project Manager appears. You are now ready to begin working with your sequencing project.
If an error message appears, try initializing the package again. If you still have trouble, see your system manager.
Creating a sequencing project
To create a project:
1. From the Project menu, choose Create Project...
The Create New Project dialog box appears.
2. In the “Type new project directory name here” text box, type demo after the displayed directory path.
3. Click OK.
The Create New Project dialog box closes, and you now have a new sequencing project named demo.
Adding fragments to a project
To add fragments to your demo project:
1. From the Project menu of the SeqMerge Project Manager, choose Add Sequences From -> Sequence Files....
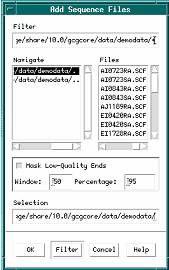
The Add Sequence Files dialog box appears.
2. Delete the file specification information from the Filter text box and type seqmergedemodata:*.SCF in its place.
Note: The SCF must be in uppercase.
3. Click the Filter button.
The Files scroll list now contains all of the example fragments you’ll add to your sequencing project.
4. Select all of the fragments in the Files scroll list.
a. Click on the first
fragment in the list.
b. Scroll to the bottom of the list.
c. Shift-click (press and hold the <Shift> key while clicking) on the last fragment in the list.
5. Accept the default parameters for fragment end masking and click OK.
The selected fragments are added to your sequencing project. For more information, see “Adding Fragments to a Project” in Section 3, Working in the Project Manager.
6. Click Cancel.
The Add Sequence Files dialog box disappears, and you are left with the SeqMerge Project Manager.
Finding and masking vector sequences
If any of the fragments contain vector contamination at their ends, you’ll want to mask the contaminating region before assembling the fragments so the contamination doesn’t affect the assembly.
SeqMerge allows you to a) specify and add the vectors you used for sequencing to your project, b) scan your fragments for contaminating vector sequence, and c) mask, or hide the contaminating sequence from the assemble program.
Note: For details on the steps in this part of the tutorial, see Section 4, Masking Vector Sequences.
To add vector sequences to your project:
1. From the Project Menu in the SeqMerge Project Manager, select Vectors...
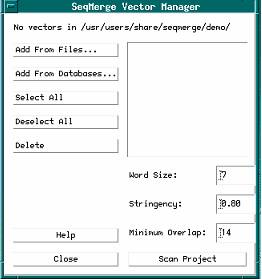
The SeqMerge Vector Manager dialog box appears.
2. Click Add From Files...
The Add Vector Files dialog box appears.
3. Delete the current filter from the Filter text box and type SeqMergeDemoData:*.vector in its place.
4. Click Filter.
The Files scroll list now contains all of the example vector sequences you’ll want to select for your sequencing project.

5. Select both vector sequences in the Files scroll list.
a. Click on the first sequence in the list.
b. Shift-click on the second sequence in the list.
6. Click OK.
The selected vector sequences are now added to your sequencing project.
7. Click Cancel.
The Add Vector Files dialog box disappears, and the SeqMerge Vector Manager dialog box appears.
To mask vector sequences:
1. Select both vector sequences by clicking Select All in the SeqMerge Vector Manager dialog box.
Both vector sequences in the list should be highlighted.
2. Click Scan Project.
SeqMerge proceeds to check your fragments for the presence of vector sequences. If SeqMerge finds vector sequences at the ends of the fragments, it masks those sequences so they won’t affect the assembly.
3. Click Scan Project again.
Note: SeqMerge masks only the ends of fragments. Therefore, if you have nested vector sequences (as in this tutorial), you may need to scan the project again to ensure that you masked all vector sequences.
4. Click Close.
The SeqMerge Vector Manager dialog box disappears and you are left with the SeqMerge Project Manager. (SeqMerge displays a “V” in the Mask column if a fragment contains masked vector sequence.)
Note:
You must scan and mask vector contamination from fragments before
assembling them. Once fragments are
included in contigs, they cannot be masked.
(If you decide to mask a fragment that is part of a larger contig, you
must disassemble the contig first.)
Assembling fragments
SeqMerge assembles your fragments into contigs. In this example project, all fragments assemble into a single contig.
Note: For details on the steps in this part of the tutorial, see Section 5, Assembling Fragments.
To assemble the fragments of your project:
1. From the Assemble menu of the SeqMerge Main Window, choose Assemble....
The Assemble Project dialog box appears.
2. Verify that “Assemble All Contigs” is selected at the top and that “Assemble Current Contigs” is selected at the bottom of the dialog box.
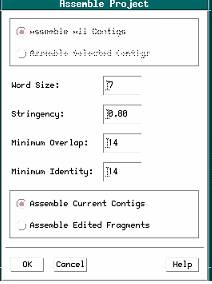
3. Click OK.
After the assembly is complete, the Assemble Project dialog box disappears and you are left with the SeqMerge Project Manager. The window now contains a single contig named ai0723sa. This name is derived from the left-most sequence in the contig alignment.
Viewing the contig
The fragments have been assembled into a single contig that can be viewed in the SeqMerge Contig Editor.
To view a contig:
1. Open the SeqMerge Contig Editor and select contig ai0723sa for viewing.
Choose one of the following:
a. Double-click on ai0723sa in the SeqMerge Main Window.
b. Select ai0723sa in the SeqMerge Main Window by clicking on it, and then choose Edit Selected Contigs from the Edit menu.
The SeqMerge Contig Editor appears with the ai0723sa contig loaded into the editor.
2. Resize the window to view more of the alignment by clicking and dragging a border of the window.
3. Change the size of the work areas for the contig data and contig graph by clicking and dragging the window shade’s rectangle, above and to the right of the contig graph.
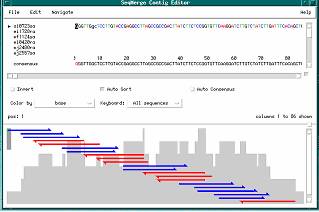
To view the masked vector sequences in the alignment.
1. Position the cursor anywhere on the fourth row of the alignment. An arrow appears to the left of the fragment name, ei0420ra, indicating that the cursor is positioned on this row. This name is preceded by a “V”, indicating that this fragment contains masked vector sequence.
2. Press <Ctrl>B to position the cursor at the beginning of this fragment. The first 596 bases of this fragment are colored gold, indicating that they are masked vector sequence. These 596 bases were masked earlier in the “Finding and Masking Vector Sequences” section and were then ignored during contig assembly.
Navigating through the alignment
SeqMerge provides several ways to help you navigate through the fragments in a contig.
Note: For details on the steps in this part of the tutorial, see “Navigating through Contigs” in Section 6, Working in the Contig Editor.
To navigate through the alignment, Choose one of the following:
1. Use the scroll bars below and to the right of the contig alignment to find a specific position within the contig.
2. Position the cursor in the contig alignment with a mouse click and use the keyboard arrow keys.
3. Use the greater than and less than signs (< and >) to scroll horizontally, one page at a time.
4. Type a number and press <Return> to move to that position in the alignment. For instance, typing 1300<Return> moves you to position 1300 in the current alignment.
5. Click on one of the bars in the contig schematic located in the lower part of the SeqMerge Contig Editor. Each bar represents one fragment. The sequence data for that region of the contig is displayed in the editor.
a. Click and drag the target box in the contig graph.
b. From the Navigate menu, choose from the following options:
c. Move to the beginning or ending of the current fragment by selecting Beginning of Fragment or End of Fragment.
d. Move to the next position of mismatch in the consensus sequence by selecting Next Mismatch in Alignment.
e. Move to the next position of mismatch with the current fragment by selecting Next Mismatch in Fragment.
f. Move to the next gap in the consensus sequence by selecting Next Gap in Consensus.
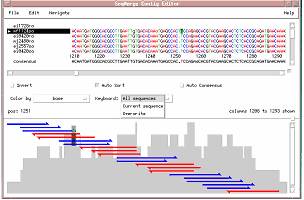
Editing contigs
You may want to edit a contig alignment to resolve inconsistencies among the fragments at a specific column:
Note: For details on the steps in this part of the tutorial, see “Editing in the Contig Editor” in Section 6, Working in the Contig Editor.
To edit the contig:
1. Position the cursor anywhere on the third row of the alignment. An arrow appears to the left of the fragment name, mf1124sa, indicating that the cursor is positioned on this row.
2. Press <Ctrl>B to position the cursor at the beginning of this fragment.
3. From the Navigate menu, choose Next Gap in Consensus.
The cursor moves to the next column in this fragment where there is a gap character in the consensus sequence. Your cursor should be positioned on a T at position 1250. Note that all other fragments have a gap character in this column of the alignment. You may suspect that the additional T in fragment mf1124sa at position 1250 may be due to a miscalled additional base in the trace chromatograms.
4. View the trace chromatograms of the fragments at this position. Choose one of the following:
a. Double-click on the T at position 1250.
b. From the File menu, choose Show Traces.
The SeqMerge Trace Viewer appears and displays the trace chromatograms for fragment mf1124sa, centered at position 1250. Note the peak at this position is ill-formed and very broad. Compare this chromatogram with the same region in other fragments by scrolling through the other fragments in the Trace Viewer. You may conclude that the additional T at position 1250 in fragment mf1124sa is due to a miscalled additional base.
5. Delete column 1250, containing the miscalled additional base, from the contig alignment.
a. Type
1251<Return>
The cursor is positioned one column to the right of the column you wish to delete
b. Press the <Delete> key.
SeqMerge deletes the column to the left of the cursor from all fragments, including the consensus. All fragments are still aligned properly after this column deletion.
Note: You can edit one fragment at a time rather than all of them by clicking the Keyboard menu button and selecting Current sequence.
For more information, see “Editing in the Contig Editor” in Section 6, Working in the Contig Editor.
Exporting contig consensus sequences
Once you’ve resolved inconsistencies among the fragments in your contig alignment, you may wish to export the contig consensus sequence for use with other GCG programs.
To export a contig consensus sequence:
1. From the File menu in the SeqMerge Contig Editor, choose Export Consensus....
2. Verify that Export All Consensus Sequences is selected.
3. Type the name of the file in the RSF FileName: text box.
4. Click OK.
SeqMerge creates an RSF file containing the contig consensus sequence. If the output file is named seqmerge.rsf, the consensus sequence can be specified as seqmerge.rsf{consensus}.
Exiting SeqMerge
To exit SeqMerge:
1. From the SeqMerge Contig Editor, choose Close from the File menu.
2. Click Yes to save your changes.
3. From the SeqMerge Project Manager, choose Exit from the Project menu.