Getting
Started
[Genhelp | Program Manual | User's Guide | Data Files | Databases | Release Notes ]
Table of Contents
Overview
Fundamentals: Using UNIX
Getting help for UNIX
Logging on
Working with directories
Displaying directory contents
Creating directories
Changing directories
Defining and using logical names for directories
Working with files
Creating and editing files
Specifying files
Deleting files
Displaying and changing file protections
Using wildcards
Viewing files
Using command line redirection
Controlling program execution
Running jobs in the background
Displaying background jobs
Moving a job to the foreground
Terminating a background job
Logging off
Quick reference
UNIX commands
Controlling screen output
Getting started with GCG
Initializing GCG
For advanced users
Customizing your login
Initializing GCG
Automating program commands
Overview
This section helps prepare you to use
Accelrys GCG (GCG). Written with the novice user in mind, it
provides you with the fundamentals of working with the UNIX operating system.
While the commands and procedures in later sections and in the Program Manual
often assume that you have a working knowledge of UNIX commands, this section
assumes you have little or no experience working with the computer, and it
provides you with that basic groundwork.
You can find
details on working with files and directories, logging on and off the system,
and customizing your login environment in this section. It also explains how to
start running GCG.
GCG is
installed on a computer using a UNIX or Linux operating system. You can connect
to that computer in one of two ways: 1) you are directly connected to the
computer, or 2) you connect to the computer over the network. The device you
are using could be a dumb terminal, a console, an X Windows terminal, or a PC
or Macintosh running terminal emulation software. Regardless of what device you
are using to access GCG, you must become familiar with UNIX commands to use
GCG programs and manipulate the output.
Fundamentals: Using UNIX
Your system
manager has just set up a UNIX account for you to use the GCG. But what if
you've never used UNIX before and you're not sure where to start? This section
will walk you through the basics of using the UNIX operating system. If you
take a little time now to learn the basics of UNIX, you will increase the
efficiency with which you can later work with GCG.
This section
teaches you how to
- Get help for UNIX.
- Log on.
- Work with directories.
- Work with files.
- Customize your login.
- Use command-line redirection.
- Control program execution.
- Log off.
- UNIX commands are case sensitive. That
is, uppercase commands are distinguished from lowercase commands which are
distinguished from mixed case commands. Type carefully!
- Some UNIX commands require input
files. For example, rm (remove)
requires the name of the file to be deleted.
- UNIX commands support parameters,
also known as command-line switches, which modify the action of the
command. You precede parameters with a space and a dash (-), and you can
use multiple parameters to modify a command. For example, consider the
command % ls -l -a.
The -l
parameter modifies the command ls
(list) to display each file in your directory with its file protection
(read, write, execute) information. The -a parameter modifies the
command to list all files in your directory, including those that begin
with a period.
It is beyond
the scope of this manual to provide detailed instructions in the use of text
editors. However, we do provide the basics to get started using vi in Appendix B, Text Editor Basics. For more information
about the default text editor vi, see the
documentation for your UNIX system. For other text editors, see the appropriate
program documentation.
Getting help for UNIX
To access
online help for UNIX commands:
Type % man command_name.
For example, % man ls
displays online help for the UNIX command ls (list).
The UNIX
commands are also described in detail in your UNIX operating system manuals. For
more information, see your system manager.
Logging
on
To use GCG, you will be in one of two possible situations: 1) you are directly
connected to the computer, or 2) you connect to the computer over the network.
The device you are using could be a dumb terminal, a console, an X Windows
terminal, or a PC or Macintosh running terminal emulation software.
To log on
to a UNIX machine:
Note:
You must have an approved account, also called a login, from the system manager
to use any UNIX computer. The system manager usually sets up a user name, which
is typically your first or last name, and lets you specify a password for
security. No one can access the system through your account without your
password. Keep your password secret.
- Because each site is different, ask
your system manager for instructions on how to connect to the UNIX
computer.
When
you are connected, you should see the prompt "Login:" on the screen.
If you don't, press <Return> until the prompt appears.
- Type your user name and press
<Return>. The system displays the prompt "Password:".
Note:
Your user name and password are case sensitive; that is, the computer
distinguishes uppercase letters from lowercase letters. Therefore, type your
login name and password exactly as they are set up in the system.
- Type your password and press
<Return>. For security, you will not see your password appear on the
screen as you type. The system welcomes you and logs you in.
Note:
If you make a mistake in typing your user name or password, press
<Delete> to delete the error or press <Return> and try again.
When
you see the operating system prompt (%) in the left margin of your screen,
the computer is ready for your commands. Note that the % prompt is a convention used in this
guide. Your site may have set up a different prompt.
Working with directories
You can
think of a directory as being similar to a file cabinet. Within the file
cabinet you can find drawers (or subdirectories) and files. Subdirectories,
like file cabinet drawers, help you organize your files into loosely related
groups.
When you log
in, you will be in your top directory, also known as your home directory. Your
current (or working) directory refers to whatever directory you are presently
working in.
For more
information on working with directories and UNIX commands, see the
documentation for your UNIX operating system or your system manager.
Displaying directory contents
To display
the contents (that is, the files and subdirectories) of your current directory:
Type % ls
(list).
To display
what directory you are currently working in:
Type % pwd
(print working directory).
Creating directories
Your system
manager probably provided you with one directory in which to maintain your
files--your home directory. To help organize your files, you may want to create
subdirectories within your current directory.
To create a
subdirectory:
- Move to the directory in which you
want to create a subdirectory.
- Type %
mkdir subdirectory,
for example % mkdir project.
The subdirectory project appears in your current directory.
Changing directories
You've
learned how to create directories, and now you want to know how to move between
them. Consider the following example of a directory tree as you read through
the tasks below.
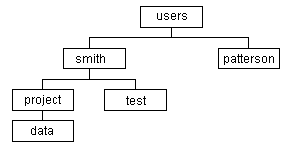
To move
from one directory to another:
Choose from
the following.
- Use the complete file specification,
also known as the absolute pathname, to move to a different directory. For
example, if your current directory was Patterson, you could change
directories by typing % cd /users/smith.
- To move down from your current
directory, type the relative path specification, % cd subdirectory.
For example, if you are in the directory /users/smith, you could type % cd project
to move down one directory or % cd project/data
to move down two directories.
- To move up one directory, type % cd
.. The ".."
always signifies the parent directory.
- To move to a parallel directory,
type % cd
../directory.
For example, if your current directory is /users/smith/project and you
want to change to the directory /users/smith/test, you would type % cd
../test.
- To move to another user's home
directory, type % cd ~username.
For example, to move from the Patterson directory to the Smith directory,
type % cd ~smith.
- To move to your home directory, type
% cd.
Note:
The following commands are only available when GCG has been initialized (see Getting Started with GCG in this section for
more information). They are not standard UNIX commands.
- To move down one directory, type % down subdirectory,
for example % down project.
- To move up one directory, type % up.
- To move to a parallel directory,
type % over subdirectory.
This command takes the place of first moving up one directory and then
back down to a different directory. For example, if you are in the
directory called /smith/project and you want to move to the /smith/test
directory, you could type % over test.
- To move to your top (or home)
directory, type % home.
- To move to a relative directory, or
to a directory defined by a logical name, type % to directory
or % to logical_name.
For example, % to gendocdata
moves you to a directory with the logical name gendocdata,
where you can find alternative GCG sample sequence files.
Defining and using logical names for directories
If you move
to a directory other than your home directory often, you can assign it a
logical name. A logical name is a shorthand name you can give a filename or
directory. Logical names often reduce typing and are easier to remember than
full specifications. The GCG utility name lets you create logical names
within a UNIX operating system.
For example,
let's say you assigned /smith/project the logical name proj.
Regardless of the directory you are located in, you can move to /smith/project
with the command % to proj
instead of typing the entire directory specification.
Note that
before you define a logical name, you should first check to make sure you will
not overwrite an existing logical name. To do so, type % name logical_name.
GCG
programs use logical names to refer to various resources in the UNIX file
system. These resources consist of directories, databases, system utilities,
shell scripts, devices, or files. For example, the logical name genrundata is assigned to the directory containing the
sequence databases and other data files. The logical names and their
specifications are maintained in a table you can view by typing % name.
To define
logical names for directories:
·
Open the $GCGROOT/etc/dirs.conf
file which contains all the logical names of GCG. Only the System manager can
define all the logical names in this file.
Note: In
Note: Logical names are case insensitive; that is, they can appear in
uppercase, lowercase, or mixed case. For example, the logical name GenDocData is the same as gendocdata.
· In
a single line, type the logical name you want to set, for example, proj. Follow this with the directory specification of the
resource for which you want to define the logical name, for example, /smith/project.
Note that directory specifications are case sensitive.
· Save
the file (dirs.conf) and exit.
To specify
a directory logical name:
Type the
logical name optionally followed by a colon and a filename, for example proj:gamma.seq.
You must use a colon (:) between a directory logical name and the filename that
follows it.
If you
forget what the logical name is defined as, then type % name logical_name.
For example: % name proj/smith/project.
Note:
Since the logical names are created within the
Working with files
Files are
where you store information in the computer. For example, sequence information
or the output of a program. Most GCG programs require one or more files as
input and produce an output file of results.
Filename
Conventions
Filenames
have a particular format: /directory/filename, where directory is the directory
in which the file belongs; and filename is the name of the file. Directory
names and filenames are case sensitive. You can use all alphanumeric characters
as part of the name; however, you should avoid using characters with special
meaning in UNIX, such as / \ " ' * ; - ? $ [ ] { } ~ ! < >. In
addition, avoid including spaces within the name. Try to make the directory or
filenames as descriptive as possible to help you remember their contents.
Unlike some
other operating systems, UNIX doesn't assign file extensions to distinguish
types of files. You can, however, add your own extensions to group similar
types of files together. GCG often adds extensions to help distinguish
output files.
Note that
UNIX saves only the most recent version of a file. Therefore, use care in
saving and naming files: if the filename already exists, the system writes the
new information over the existing file without warning you. All previous
information is lost.
For more
information on working with files and UNIX commands, see the UNIX documentation
for your system or your system manager.
Creating and editing files
Most GCG
programs create output files, some of which you can use as input to other
programs. To create files in a directory, you must have privileges to write in
that directory (see "Displaying and Changing File Protections" in
this section). If you don't, change the directory protections (if possible) or
move to another directory in which you do have the necessary privileges.
We recommend
that you learn to use a text editor to create and edit files. Files written by
most GCG programs are easily edited using text editors.
To create
and edit files:
Use a UNIX
text editor, for example vi. You can use other text editors as well. For more
information about vi, see Appendix B, Text Editor Basics or refer to the
documentation for your UNIX operating system. For more information about other
text editors, see the appropriate program documentation.
Note:
If you create and save a file under a filename that already exists in the
directory, UNIX replaces the original file with the new information. That is,
UNIX writes over the data in the original file without warning you.
Specifying files
UNIX and GCG commands often require one or more filename(s) to do their job. A simple
example of a UNIX command is when you type % rm,
the computer expects you to supply it with the name of the file to remove. As
an example of a GCG command, when you run the Map+ program, it asks you
"MAP of what sequence?" In such instances you need to specify a
filename.
To specify
a file to a program or command:
Choose one
of the following.
- Files in your current
directory. If the file is in your current directory, type the
filename, for example gamma.seq.
- Files in other directories.
If the file is in a directory other than your current directory, type the
entire file specification, for example /smith/project/gamma.seq. If the file is in a
subdirectory of your current directory, use the relative file
specification, for example project/gamma.seq.
When you are using GCG commands, you can use logical names within the
specification, for example share_tfsites:tfsites.dat.
Note:
For more information about directories, see "Working
with Directories" in this section.
Deleting
files
You will
find it necessary to clean up your directories at times and to delete unnecessary
files. You can do this with two commands: rm
(remove file) and rmdir
(remove directory).
To delete
files from a directory:
Choose from
the following.
- rm. Type % rm filename
where filename is
the name of the file(s) you want to delete. For example, % rm gamma.seq
deletes a file named "gamma.seq" in
your current directory; % rm gam*
deletes all files beginning with "gam."
- rmdir.
Type % rmdir directory_name
where directory_name
is the name of the directory you want to delete. For example, % rmdir project
deletes the "project" directory from your current directory.
Displaying and changing file protections
File
protection is a means of security by which three categories of users are
assigned privileges to each file: user (you), group (the group(s) you belong
to, for example your lab), and other (everyone outside your group). Each
category has certain privileges of access and use:
(r) read -
Users can read the contents of the file or directory.
(w) write -
Users can write in and edit the files or directory.
(x) execute
- Users can execute the file or files in the directory or can
display the contents of the directory.
To display
protections for files in your current directory:
Type % ls -l.
The system
displays the name of each file followed by the protections (rwx)
grouped by user, group, and other. For example
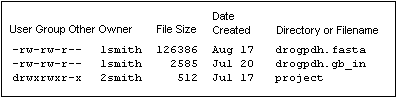
As you can
see in this example, directories as well as files have protections assigned to
them.
To change
file protections:
Type % chmod u=protections filename,
where u defines the category of user (u [user],
g [group], or o [other]) and protections
defines the protections you want to set (r [read], w [write], or x [execute]).
Using
wildcards
Use
wildcards to specify multiple files. An asterisk (*) wildcard serves as an ambiguous
replacement for one or more characters; the * means "anything or
nothing." You can also use a percent sign (%)
wildcard as an ambiguous replacement for a single character. Consider the
following examples:
- Bov* includes all files that begin with
"Bov".
- gamma%.seq includes all files
that contain "gamma" followed by a single character, for example
gamma1.seq.
- % ls *.seq
displays all files in your current directory with the extension ".seq".
- % cp *.* /smith/project copies
every file in the current directory to the directory /smith/project.
Most UNIX
commands and some GCG programs accept wildcards in file specifications.
Note:
If a command allows two file specifications on the command line, never use
wildcards in the second parameter, for example % cp *.txt *.seq. Using
wildcards in this manner will produce unexpected results.
Viewing
files
To view the
contents of files:
Choose from
the following.
- cat. To display the entire contents
of a file, type % cat filename, for example % cat gamma.seq.
- more. To display the contents of a
file screen by screen, type % more filename,
for example % more gamma.seq.
Press the <Space Bar> to advance from screen to screen. Press q to exit more and return to the command
line.
Using command line redirection
Every UNIX
program or command can read or write to:
- Standard input. The
stream from which a command takes its input, such as from the terminal, a
file, or the previous process in the command line.
- Standard output.
The stream to which a command sends its output, such as to the terminal, a
file, or the next process in the command line.
For example, "piping" ( | ) means redirecting the standard output of one program to the standard input of another. - Standard error. The
stream by which a command sends error messages, such as the terminal, a
file, or to the next process in the command line.
The table
below describes the command line characters you can use to redirect standard
input, output, and error. Notice that you can combine input and output
redirection characters on the command line.
|
Task |
Character |
Example |
Definition |
|
Redirecting
|
< |
% sort < unsorted.txt |
The
Sort program uses the file unsorted.txt as standard input.
Standard output is displayed on your screen. |
|
Redirecting
|
> |
% sort < unsorted.txt > sorted.txt
|
The
Sort program uses the file unsorted.txt as standard input and
writes standard output in the file sorted.txt (instead of on your screen). |
|
Redirecting
|
>&
(csh) |
% sort < unsorted.txt >& sorted.txt
|
The
Sort program uses the file unsorted.txt as standard input and
writes standard output and standard error in the file sorted.txt. |
|
Appending
|
>> |
%
sort < unsorted.txt
>> sorted.txt |
The
new data in the file sorted.txt is added to the end of an
existing file, if there is one. This prevents existing data from being
overwritten. |
|
Piping
|
| |
% sort < unsorted.txt | more |
The
output of the Sort program is used as standard input to the More program. |
Controlling program execution
With UNIX,
you can run several programs at once from the same terminal. UNIX allows you to
do this by running programs in the foreground or background.
- Foreground jobs. A
foreground job allows you direct input from the keyboard. You can have
only one job running in the foreground; the terminal cannot be used for
another job until the current foreground job finishes.
- Background jobs. If
a job is running in the background, the system is working on it out of
view, freeing your terminal for other work. You can have multiple jobs
running in the background.
The
ability to put jobs in the background is very useful; it allows you to keep
working at your terminal even though you are running one or more programs which
take some time to complete.
If
you want to run one or more jobs in the background, keep the following points
in mind:
- You can't give
background jobs input from the terminal or keyboard. Thus, if a program
you are running has prompts which require your input, it will stop when
it reaches the first unanswered prompt. Therefore to run such programs,
you must use the necessary command-line parameters which answer those
prompts and allow the program to run to completion.
In
GCG, you can bypass most program prompts by using parameters on the command line.
For more information on using command-line parameters, see "Using Program
Parameters" in Section 3,
Running Programs.
- If a foreground
job typically sends output to the terminal screen, it also will do so
when it is a background job. Therefore, to avoid output scrolling on your
screen from a background job while you are working on a foreground job,
redirect the output from the background job into a file.
Running jobs in the background
Although you
can run only one program in the foreground, you can run multiple programs in
the background.
To run a
job in the background:
Add an &
(ampersand) to the end of the command line, for example % fasta ggammacod.seq
-Default &.
The system
puts the job in the background and displays a response similar to the
following:
[1] 14999
%
The number
in square brackets [ ] is your job number, in this case job number 1. If you
ran a second job in the background, it would have a job number [2]. The second set of numbers is the
process identification (PID) number assigned by the system. The system prompt (%) tells you the system is ready for your
next command.
A job will
stop running if it needs information that you must enter at the keyboard, such
as a filename or other parameter. When this happens to a background job, the
system displays a message similar to the following on your screen:
[1] + Stopped (tty input) fasta
To continue the job, bring it to the foreground. The job, requiring your input,
continues from where it stopped. For more information, see "Moving
a Job to the Foreground" in this section.
If you log
out while running a background job, the job continues to run. When the job
finishes processing, its output file appears in the directory you specified.
Note:
Some programs, such as those that search the databases, are computationally
intensive and take some time to execute. You can use the -Batch parameter to submit these
programs to the batch queue to execute at a later time. For more information
about the batch queue, see "Using the Batch
Queue" in Section 3,
Using Programs.
Displaying background jobs
To see a
list of all jobs currently running:
Type % ps-aef\grep <program name>. A list of each background job you are
running appears on your screen, marked as either running or stopped. A running
job is executing in the background. A stopped job is one that either you or the
system put on hold. For example
[1] +Running (set noglob;
$GCGUTILDIR/fasta ggammacod.seq
-def)
[2] -Stopped (set noglob; $GCGUTILDIR/mfold -save ala-trna.seq -def)
Moving a job to the foreground
Let's say
you ran a program and put it in the background. But the program stopped after
encountering an unanswered prompt. What do you do? You can move the program
into the foreground. The program continues from where it left off in the
background.
To move a
background job to the foreground:
1.
Type % ps-aef\grep <program name> to see a
list of the jobs running in the background.
2.
Type % fg %job_number, where job_number is the number
appearing between square brackets [ ] in the job listing. For example, % fg %2
brings job number 2 into the foreground.
You can put
a foreground job in the background again by pressing <Ctrl>z to stop the
job then typing % bg
(background) to put it in the background for processing. The job will continue
running in the background
Terminating a background job
To terminate
a background job:
1.
Type % ps-aef\grep <program name> to see a
list of the jobs running in the background.
2.
Type % kill: job_number,
where job_number
is the number appearing between square brackets [ ] in the job listing. For
example, % kill %2 terminates job number 2.
Logging
off
To end a
session with a UNIX system and log out:
Type % logout.
Note:
If you are running a program in the background from csh
when you log out, and you redirected the output to a file, the program runs to
completion and places the output file in the directory you specified. However,
if you haven't directed your output to a file, when you log out, the program is
terminated before completion.
Quick
reference
UNIX
commands
You should
become familiar with the following UNIX operating system commands to use the
UNIX system and GCG programs effectively and efficiently. For more
information on UNIX commands, see the documentation for your UNIX operating
system.
|
Command |
Example |
Description |
|
% cat filename1 filename2 > new_filename |
% cat temp.txt gamma.seq
> new.seq |
Combines
the temp.txt and gamma.seq files and creates a new
file, new.seq, with their contents. |
|
% chmod u=protections
filename |
% chmod u=rwx temp.txt |
Changes
the users (u) protections (r=read, w=write, x=execute) on a file. |
|
% cp filename1 filename2 |
% cp gamma.seq temp.txt |
Creates
a file called temp.txt that contains the same data as the gamma.seq
file. If a file temp.txt already exists, it is overwritten. |
|
% finger username |
% finger smith |
Displays
the shell you are using as well as other information. |
|
% grep character_pattern
filename |
% grep smithies gamma.seq |
Looks
through gamma.seq for the character pattern
smithies and displays the lines that match the pattern. The character_pattern
and filename are
case sensitive. |
|
% logout |
% logout |
Ends
your session with UNIX. |
|
% ls |
% ls |
Lists
all of the files in your current directory, except those beginning with a
period (.). |
|
% ls –parameters |
% ls -a |
Lists
all the files in your current directory, including those beginning with a
period, for example .login. |
|
% ls /directory |
% ls /smith/project |
Lists
all the files in the /smith/project directory, except those beginning with a
period. |
|
% man command |
% man ls |
Displays
online documentation for the ls
command. The -k
parameter displays all commands related to the keyword you provide. This is
useful if you remember a command's function but do not remember the command
name. |
|
% mkdir subdirectory_name |
% mkdir project |
Creates
a subdirectory called project under your current directory. |
|
% more filename |
% more gamma.seq |
Displays
the gamma.seq file on your terminal, one screen at
a time. Press the <Space Bar> to advance screen by screen. |
|
% mv filename1 filename2 |
% mv gamma.seq
temp.txt |
Changes
the name of the gamma.seq file to temp.txt, writing
over the contents of temp.txt, if it already exists. |
|
% pwd |
% pwd |
Displays
the full path of your current directory. |
|
% rm -i
filename |
% rm -i
gamma* |
Deletes
all files in your current directory that begin with the characters gamma. The
-i
parameter makes you confirm the deletion. |
Controlling screen output
The
following is a partial list of key combinations you will find helpful in
controlling screen output. For more information on terminal keyboard
combinations, see the documentation for your UNIX operating system.
|
Control
Key |
Description |
|
<Ctrl>c |
Cancels
a program or an executing UNIX command. |
|
<Ctrl>o |
Suppresses
screen output without stopping the program. |
|
<Ctrl>z |
Suspends
a job. Typing % fg %job_number brings the suspended job to
the foreground where you can work with it again, for example % fg %6.
If you cannot remember what programs you suspended, type % jobs to list the jobs and job
numbers. |
|
<Ctrl>s |
Stops
screen output from scrolling off the screen. |
|
<Ctrl>q |
Resumes
screen output that has been stopped by <Ctrl>s. |
|
<Ctrl>u |
Deletes
text from the cursor to the beginning of a line. |
|
<Ctrl>r |
Refreshes
the line while typing a command. |
Getting
started with GCG
Note: Sections 2-5 in this guide provide general instructions for
all programs in GCG. For detailed instructions about a specific program, see
the Program Manual.
Initializing GCG
To use GCG, you must first initialize your environment. Initializing your
environment gives you access to GCG programs, the databases, data files the
programs need, logical names, and other information required for the Package to
run smoothly.
To initialize GCG:
To initialize GCG type the following
on the command line:
% source <Installed directory
Path>gcgstartup
% gcg.
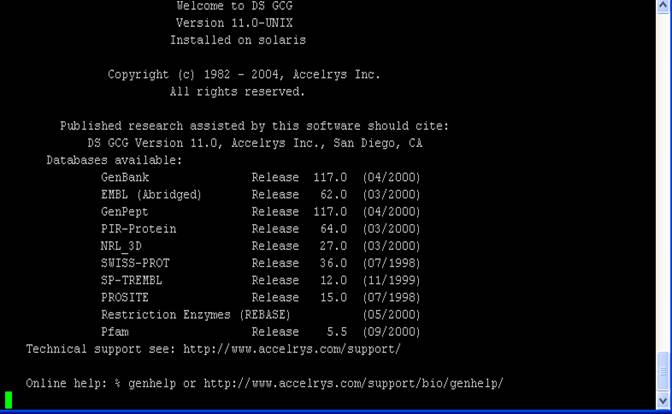
The system takes a few seconds to initialize GCG and displays a banner
similar to the following:
The banner displays the version of the package you are running, as well as
the reference you can cite if you use GCG in your publishable research.
(Because the banner changes with each update to the available databases, your
banner may look slightly different than the one above.)
When you see the operating system prompt (%),
GCG is ready for use.
Note:
Some of the programs like motifs and prime in GCG are resource intensive. To
make sure these have enough resources in the system to run, you can try running
unlimit before you run these programs.
% unlimit
Note: The % prompt is a convention used in this guide.
Your site may have set up a different prompt. Also, if the above commands do not
initialize GCG on your system, see your system manager. For more
information, see the section “Configuration” in the section “GCG Environment”
in the System Support Manual.
For help working with GCG, check the documentation, look in the GenManual
or GenHelp online help, or contact technical support. For more information, see
"Getting Help" in
the preface "Before You Begin."
TIP - If your primary reason for using the UNIX system is to use GCG, you may want to customize your login to automatically initialize it. To do so, you need to create or edit your .login or .profile file. For more information on working with login initialization files, see "Customizing Your Login" in the "For Advanced Users" section of this section.
For advanced
users
The information in this section is intended for users who are familiar with
the operating system. This section teaches you how to
- Initialize GCG in your
login.
- Automate program commands
in your login.
- Define logical names in
your login.
- Define your graphics
configuration in your login.
Customizing
your login
You or your system manager can customize your login to ensure that certain
commands execute or are available every time you log in. For example, you may
want to customize your login to automatically initialize GCG. Or, you can
assign logical names for filenames and directories so that each time you log
in, they will be defined automatically. To do these things and more, you can do
this with two files:
Note: To determine which shell your system runs under, type % echo $SHELL.
- .login (csh) or .profile (ksh).
A shell script that defines your UNIX user environment. For example, if
your primary reason for using UNIX is to use GCG, you may want to
customize your login to automatically initialize it. UNIX executes the
.login or .profile file each time you log in.
- gcgrc (csh)
or .gcgrc.ksh (ksh).
A shell script that defines your aliases for GCG programs and operating environment. For example, if you find that you
frequently use a program with the same parameters, you can define an alias
as a shortcut command for the program and parameters. (For more
information about shell scripts, see "Working
with Shell Scripts" in the "For Advanced Users"
section of Section 3, Using Programs.)
When you initialize GCG environment, the last step
in the initialization process is the execution of the aliases (csh) or aliases.ksh (ksh) file present in the $GCGROOT/etc directory. This file
is not executed until after the logical name and symbols are fully initialized.
Because of this, the aliases (csh) or the aliases.ksh file is the best place to put your customized
commands.
Note: The
aliases (csh) and aliases.ksh
(ksh) can be modified by the sytem
administrator only.
Apart from system aliases, which are automatically
sourced by GCG Environment, you can define your own aliases and source that
file separately after initializing GCG Environment.
Note: The aliases set
by $GCGROOT/etc/aliases (csh) or $GCGROOT/etc/aliases.ksh can be
overridden if you have written your own aliases file in your local environment.
You should be careful not to override the aliases already defined in the $GCGROOT/etc/aliases
(csh) or the $GCGROOT/etc/aliases.ksh file.
To create a .login (csh) or .profile(ksh) , aliases (csh) or aliases.ksh (ksh) file:
Use a text editor of your choice, for example vi.
Create the file(s) in your top directory.
Note: To test your login file after you've edited and saved it,
type % source filename (csh) or % . filename (ksh), for example %
source
.login (csh) or % . .profile (ksh). The
system reruns the file.
Initializing GCG
To set up your login to automatically initialize GCG:
- Open your .login (csh) or .profile (ksh) file
in the text editor of your choice, for example vi.
- Use the following as an
example of what to type:
(csh)
%
source <Installed directory Path>gcgstartup
% gcg
% source .gcgrc
(ksh)
% . <Installed directory Path>gcgstartup
% gcg
% . .gcgrc.ksh
Note: The first line of each of the csh and ksh examples sets
environment variables for working with GCG. See your system manager for the
correct specification at your site.
The second line of each of the examples initializes the Package.
- Save the file and exit
from the text editor.
Note: For more information,
see "Working
with Shell Scripts" in the "For Advanced Users" section of
Section 3, Using Programs.
Automating
program commands
You may find that you frequently run a GCG program using the same
parameters each time. You can define an alias in your aliases (csh) or aliases.ksh (ksh) file to create a shortcut command for the program and
its parameters.
Before you create an alias, you should check to make sure the alias is not
already defined. To do so, type % alias
alias_name. Then (if the alias is not defined, or
if you want to redefine the alias) use the following syntax to define an alias:
% alias command_line
If you define an alias at the operating system prompt, it will be in
effect until you log out. To save your alias from one session to the next, add
it to your aliases (csh) or aliases.ksh
(ksh).
To define an alias:
- Open your aliases.ksh (location: $HOME) file in the text editor
of your choice, for example vi.
- Type the alias(es). For example, let's say you frequently run the MapPlot program with the parameter -CIRcular. To
create an alias, use the following as an example to write your own program
commands.
(csh) alias mc mapplot
-CIRcular
(ksh) alias mc=mapplot
-CIRcular
- Save the file and exit
from the text editor.
Note: Make sure the aliases.ksh file is
located in your top ($HOME)directory.
- Test the alias (es).
For csh, Type % source aliases or % source .login
For ksh, Type % . aliases.ksh or % . .profile
Type
the alias you assigned, for example % mc. The alias should run the specified
program and parameters (mapplot -CIRcular).
Defining logical
names
You can assign logical names to files you use frequently or directories that
you move to frequently. When you define logical names in your aliases (csh) or aliases.ksh (ksh) file, they are available every time you initialize GCG.
Note: Before you define a logical name, you first should check to make sure
the logical name is not already defined. To do so, type % name logical_name.
To define logical names in your aliases (csh) or aliases.ksh (ksh) file:
1. Open
the $HOME/.wp/dirs.conf file in the text editor of
your choice, for example vi.
2. On
a single line, type logical_name ~/directory,
for example
Proj ~/project.
The ~ (tilde) represents your
home directory.
3. Save
the file and exit from the text editor.
For more information on defining logical names, see the topic "Defining and Using Logical
Names for Directories" earlier in this section.
Defining your
graphics configuration
Before you run a GCG program that produces graphic output, you must
define your graphics configuration. Defining your graphics configuration means
telling the computer what graphics language you want to use and on what device
you want to display. For more information, see "Initializing
Your Graphics Configuration" in Section 5, Using Graphics.
Note: Before you start executing the steps given
below, read the file in the $GCGROOT/etc/symbol.conf
for the default graphics configuration that your system administrator has set
while installing and configuring GCG.
Note: You cannot change the graphics
configuration in $GCGROOT/etc/symbol.conf or in
$GCGROOT/etc/dirs.conf unless you have system
administrator privileges.
Note: If you need to change the graphics settings
in your local environment, you can do so by setting the required graphic setting
parameters in $HOME/.wp/symbol.conf and $HOME/.wp/dirs.conf or by defining these parameters in a aliases (csh) or aliases.ksh (ksh) file and source
the aliases file from your home directory
1. Open
your file $HOME/.wp/symbol.conf in the text editor of
your choice, for example vi.
2. Move
to the point in your file where you want to define the configuration commands.
1. On
a single line, type the commands you defined in step 1, separating each with a
single space. Most graphics configuration commands use the following format:
graphics_language graphics_device port_or_queue
where,
graphics_language is
the name of the graphics language you want to use. For more information about
what graphics languages are available, see "Configuring
Graphics Languages and Devices" in Appendix C, Graphics.
graphics_device is the
device you want to send output to, for example a graphics terminal screen,
printer, or plotter. Supported devices also are listed in "Configuring
Graphics Languages and Devices" in Appendix C, Graphics.
port_or_queue is where
the graphics device is attached, for example term
or /dev/tty11.
For example, to set up a graphics configuration
for a LaserWriter, you might type postscript
laserwriter /dev/tty11.
Note: Some graphics configuration
commands have fewer prompts, such as X Windows, and some have more, such as
HPGL. Make sure you answer all the prompts when you set up your graphics
configuration in your aliases (csh) aliases..ksh
(ksh) file.
TIP - "Initializing
Your Graphics Configuration" in Section 5, Using Graphics describes
using the SetPlot command to define your graphics configuration from the
command line. You also can use the SetPlot command in your aliases (csh) or aliases.ksh (ksh) file to define your graphics configuration for you
when you log in. To do so, follow these steps:
- Open your aliases (csh) or aliases.ksh (ksh)file in the text editor
of your choice, for example vi.
- Move to the point
in your aliases (csh) or aliases.ksh
(ksh) file where you want to define the
configuration commands.
- Type setplot graphics_device where graphics_device is the name
of one of the menu items when you run SetPlot.
- Save the file and
exit from the text editor.
- Source your aliases
(csh) aliases.ksh (ksh) file from your $HOME directory, so that the
custom graphics configuration will automatically be initialized.
[Genhelp | Program Manual |
User's Guide | Data
Files | Databases | Release Notes ]
Technical Support: support-us@accelrys.com, support-japan@accelrys.com,
or support-eu@accelrys.com
Copyright (c) 1982-2005 Accelrys Inc. All
rights reserved.
Licenses and Trademarks: Discovery Studio ®,
SeqLab ®, SeqWeb ®, SeqMerge ®, GCG ® and, the GCG logo are registered
trademarks of Accelrys Inc.
All other product names mentioned in this
documentation may be trademarks, and if so, are trademarks or registered
trademarks of their respective holders and are used in this documentation for
identification purposes only.